Showing posts with label draping online course. Show all posts

Monday, October 10, 2016

Draping and decor course: Design principle in draping and decor.

UNITY in Draping and decor

Our blog focuses on providing up to date info and ideas on the latest news and trends in the events industry. We want to inspire our students and our clients across the country and even around the world to create and inspire the most exquisite events and weddings dreams are made of. For information on our latest courses and specials visit our website www.ectaint.com or follow the links to DrapingWedding Planning and Decor courses. We offer in-class, correspondence and for our internet addicted students, online. Enrol today! For our video tutorials, please click here!


Today we are going to look into the design principle of Unity and how we can use it in Decor and Draping. It is important to now that you do not have to be a person with an degree to be able to figure out how to use design principles in event decor.

According to Dawn from Revel and Glitter blog: "By no means am I an expert with years of design under my belt.  But as you work on more events, you start getting ‘the eye’…something doesn’t look right, something’s missing…and you’ll keep playing around until you get what feels right to you." This is so true... Most of the time something just looks right ...and the further you go in decor the more easier you will see something is right or wrong.

Two examples from Revel and Glitter blog: 


"This pretty cheese table from The Pretty Blog shows that just using the same color of serveware can pull a table together quickly…white serveware makes your food look amazing…cough, cough.  Keeping it simple with clear glass that continues to showcase its contents is the perfect look."


"Real Simple’s repetitive party table keeps the stripes theme going throughout all the party items; everything is kept grounded by the tablecloth."

Unity is the feeling of harmony between all parts…a cohesion between all the elements.   Basically, you are using the other principles of design together and just about every party set up is unified…either through color, shape, pattern, theme (like dragons or a tea party), scale…well you get my point.


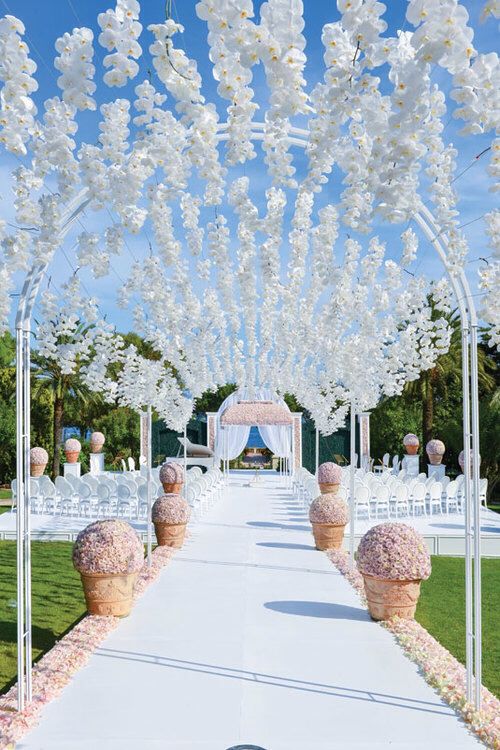
Lets look at a few photo's and discuss why it is in Unity or why we would say it is not in Unity.


This photo is a brilliant example of unity. The fact that the wedding designer used the earthy wood and soft apricot color together and  the fact that those two elements where repeated cause the harmony of this candy table. They also used symetry and balance in this table. If you draw a line in the middel from top to bottom each side is exactly the same as the other side. Immediately you will get a feeling that "this table looks rigth" as Dawn would have said.


In this photograph the backdrop of the wedding table and the table decor itself is forming a unity because of the fact that the gold in the chairs picks up the gold in the frame and the gold of the decor on the table. So we can say that they created unity by repetion.


In a setting like this - all natural it will be easy to wonder how on earth can I create unity in a barn. It is easy... Keep to the rustic natural look and feel of the barn. I they decided to use a fabric backdrop in this venue it would have stand out as an element on its own. It would not have formed unity. The fact that they used green leaves for the backdrop have immediately formed a unity for the bride. So we can say again: they have created unity by repetition.


The photo above and below is one of the most easiest ways to create unity. Unity by the repetitive use of the right color. It is also unity by simmetry and balance.


The most difficult style there is to create unity in is the Bohemian style. Most people that will try to create a bohemian atmosfere will create a disordered, muddled, chaotic space. Yes, to create a Bohemian space you will used items that will not look the same and will not be the same texture etc.
The biggest thing to remember when you want to get unity in a bohemian space is to keep the colors the same. So..if you want to bring in musterd yellow..make sure that all yellow you use will be the exact shade of mustard yellow. In such a way you will be able to get a Bohemian unity and harmony.

Please go and read the series of articles from Revel and Glitters - it is very informative. http://revelandglitter.com/2013/04/tuesday-tip-elements-of-design-in-party-decor-unity/#.UxZDYnlN0YU

Photo credits
Pinterest


Friday, October 7, 2016

Draping course. Halloween draping

Halloween Draping

Our blog focuses on providing up to date info and ideas on the latest news and trends in the events industry. We want to inspire our students and our clients across the country and even around the world to create and inspire the most exquisite events and weddings dreams are made of. For information on our latest courses and specials visit our website www.ectaint.com or follow the links to DrapingWedding Planning and Decor courses. We offer in-class, correspondence and for our internet addicted students, online. Enrol today! For our video tutorials, please click here!


Many in our secular society believe Halloween is nothing more than a harmless festival that allows kids to collect candy. But is it? Its origins lie deeply rooted in the occult, and Christians feel they should stay away. Myself... I do not beleive of participate in or like Halloween BUT i've learned one thing in the Decor Industry...If there is someone that knows how to build props...then it is the Halloween followers. The same with Halloween draping. I've taken those ideas and made for my company lots of "curtains" and "drapings" that I can use for a lot of Themes. Just think about Pirate, Shipwreck, Jungle, Murder theme, Neverland etc. At my company - Imagine Events - We just call it Drippy Cave.

This curtain is not something that you can use in a theme except in a Horror theme. If you want to do such a draping - just take an old sheet and fold it over your draping poles and pin the material over your horizontal pole. Then the fun starts. Use red and black paint and make a lot of bloody hand prints etc on this sheet. Pls don't think you can get it cleaned again!!


The following is made from cheesecloth or another thin, airy type of material.


The main idea on these is to hang it over a pole or curtain rail and just start cutting it in strips and holes. If you want to you make it look dirty then it is a good idea to throw the whole "curtain" in either strong coffee or tea. Keep it a while there and then you can take it out to dry.


Another easy way to do it is to cut up black bags in strips. Here is a link to a video that will show you step by step on how to do this plastic Halloween draping. https://www.youtube.com/watch?v=rWSdKX72qJA

Now my way of making drippy cave. I normally use spun bond which is a very cheap fabric that is used by upholsterers. It is a light weight non woven fabric.


Start cutting the spunbond in large squares or strips. Not thin strips!! Then you can use normal paint pigment that you would use to color paint. I normally take a brown paint pigment. Take a large container with water in and then you dip the drippy cave in the brown water. Please do it outside on the grass because that water and paint mixture will stain paving etc.


You will see that we've cut a lot of holes into the fabric after it was colored and dried. Please just make sure that you don't cut even little wholes in the fabric. The idea is uneven wholes and strips - it must look old and scruffy. Also don't try to color the pieces of material all the same. Some areas must be darker as others! If you want it to even look more scruffy - take mud and smear it all over your drippy cave. I can guarantee you that you will get a great effect!


Some examples of our drippy cave Halloween/Pirate draping - http://imagineevents.co.za/


Photo's and ideas from the following sites:
Pinterest.


Sunday, September 25, 2016

Draping course - Movement in Draping

Our blog focuses on providing up to date info and ideas on the latest news and trends in the events industry. We want to inspire our students and our clients across the country and even around the world to create and inspire the most exquisite events and weddings dreams are made of. For information on our latest courses and specials visit our website www.ectaint.com or follow the links to DrapingWedding Planning and Decor courses. We offer in-class, correspondence and for our internet addicted students, online. Enrol today! For our video tutorials, please click here!


Movement in Draping

No, we aren’t talking about physical movement of your party table (although if you can wing that, please invite me, because that would be awesome!), but the natural way your eye is pulled to move along certain elements.  Every time a banner is hung, either across a table or hung above, there is the literal line of the banner to follow.

According to the blog Revel and Glitter - "The paper chains in this darling table from The Caketress tell you in no uncertain terms, check out this pinwheel.  This is the easiest way to show movement, but there are a few more subtle ways to demonstrate it."


"Another way of linear movement, using materials that literally show direction. Anything with stripes, be it chevron, zebra, or regular stripes like this fun showroom featured on Felt & Wire guides your eyes all around the room"

Now the question is how can we use Movement in draping and venue decor? 


The draping up the stair is a good example of movement with draping. When you look at not only the stairs but to the draping as well - your eyes move to the top where the bride will make her appearance.


These 4 photo's above show us clearly how either a carpet, flowers or draping can move the eye to the main focus area. In this case the gazebo or arch where the bride and groom will get married.


These swags on the backdrop is also a example of movement in draping. The swags in the draping lead your eyes all over the backdrop and you can then create a centre where the bridal couple is going to sit in front of the draping.


This is an interesting example of movement and how to create it in wedding decor. In this above picture the bride used the benches and the flowers to create movement toward the front where the ceremony is going to take place.

Photo's from:
Pinterest
http://revelandglitter.com/2012/02/elements-of-design-in-party-decor-movement/

Wednesday, October 14, 2015

Online Draping course: How to drape with Ombre colors

Our blog focuses on providing up to date info and ideas on the latest news and trends in the events industry. We want to inspire our students and our clients across the country and even around the world to create and inspire the most exquisite events and weddings dreams are made of. For information on our latest courses and specials visit our website www.ectaint.com or follow the links to DrapingWedding Planning and Decor courses. We offer in-class, correspondence and for our internet addicted students, online. Enrol today! For our video tutorials, please click here!

First we must find out what is the meaning of an Ombre wedding? What does Ombre mean? Ombre means Shadow. According to Merriam-webster dictionary:

ombré

adjective om·bré \ˈäm-ˌbrā\

Definition of OMBRÉ:  having colors or tones that shade into each other —used especially of fabrics in which the color is graduated from light to dark — ombré noun


The following website describes it well...http://www.obsessedevents.com/que-pasa-ombre-embracing-the-trend . A new wedding and fashion trend referred to as “ombre”, has been growing in popularity over the past year. 

“Ombre”, which is a French term for “shaded or graduated in tone”, is a fun effect where colors blend into one another from light to dark. It can be used to showcase a range of multiple colors or shades of one color— each offering a fun effect. It’s a perfect option for a couple who wants to use lots of different colors in their wedding, in a more sophisticated way than “rainbow colors” may offer. Ombre is being used everywhere: dresses, cakes, decor, flowers, nail polish and even hairstyles.


Now where on earth can I buy Ombre Material to drape with. It all depend on the bride. Does she wants the ombre color to go from dark to light horizontal or vertical. It is much easier to get the horizontal ombre that the vertical ombre. But before we start of with explaining on how to get an ombre gradient I want to tell you a little cheat way of knowing what colors will go together with your ombre wedding.
Go to your local paint store and get some paint sample cards in the colors that you like. Now it will be so much easier to know what color material you must buy to get your favorite ombre color scheme. When you do a horizontal draping make sure you get material as close as possible to your paint cards. When doing a backdrop draping, we always advise our students to start from dark to light and then again from light to dark. In doing that your lightest colors would be in the middle and framed by your darker colors.
Remember: that rule is not set in stone. You can go the other way around as well.. with your ligther color on the outside and your darker color on the inside. Basically just don't try and mixed the ombre color to much. You will start to get a circus effect!

The bottom photo is a good example of draping  in ombre color in a different way. Here they decided to use on light and one dark. But note that they kept to the design principals of tone, symmetry and repetition. 


If you decide you want to use a vertical ombre effect I would advise you to color your own material to get the right effect that you want. There is not a lot of places where you can buy ready made ombre material in the color you want. 

On youtube is a few tutorials on how to dye in ombre style. The best one (and the one I used) was the following one: https://www.youtube.com/watch?v=N458U7QPv5s .

Photo's for this blog from the following sites:

Sunday, October 11, 2015

Draping online course

Draping Foundation Video Correspondence

(Wedding Draping—Study through the post)

http://www.ectacreativesolutions.com/shop/draping-foundation-video-course/
ECTA Creative Solutions
+27(0)218560163
info@ectaint.com

What will I learn?

Our Draping Foundation Course is the first step you will take if you want to learn how to drape. The
course looks at draping done at typical weddings. It will cover things like how to make swags that you can use on walls, main tables and cake tables. We will teach you the techniques and show you where you might be going wrong and how you could improve it in future or fix your draping problem.

Apart from the practical side of the course we look at the theory, which in the days we live and work in, is of utmost importance for you to get ahead and succeed in this competitive industry.
Some of the theory we cover includes safety and different fabric and their uses. If you would like to
know more, have a look under course contents to see which modules are covered in the course.


What can I do after completing the course?

After completing the coursem you can start draping at weddings, decorating the main table, cake table
and creating a magical backdrop for the couple. You will know how to make those perfect swags
(valences) and start your own small draping company.

Entrance Requirements

 Students should have a basic comprehension of English
 Basic reading and writing skills in English are required
 Be of age sixteen years or older
 Have access to a computer and internet
 Have access and use of a video camera or a smart phone to record (should you like to be assessed
and certified)
 You will need a basic kit to practice with. This kit you can put together yourself from the list or buy a
pre-packed kit. (please request list of items)


Duration

You will receive a maximum time of 3 months to complete your course where after the content on the
disc will expire

Course Contents

 Safety Training
 Fabric: Different Types and Care
 Fairy Light Safety and Care
 Basic wedding draping art concepts: Colour use, Lines & Texture
 Stage border & Backdrop draping
 Main table draping
 Cake table draping
 Chair draping
 Backdrop draping
 Quotation basics—How to charge for your work

How this works?

We offer student 3 main options for their course with an addition of the option to be assessed and
certified.
Option 1: You can buy only the course video/disc
Option 2: You can buy the course video/disc with a printed manual
Option 3: You can buy the course video/disc with the manual and with the addition of a starter kit in
order for you to practice

With all three options, you will have the option to be assessed and certified at an additional assessment fee.

Students can also purchase the different kits, these do not include postage or delivery, though.
All of the options are priced separately.


Assessment

 Should a student want to receive certification they will need to submit their work for assessment.
· Assessment and certification is done at an additional fee
 Students will complete questionnaires throughout the course
 Students will need to submit photos and video evidence as part of their final practical evaluation

Certification

Certification is an additional extra and should a student want to be assessed and certified they will
afterwards (should they be found competent) receive an ECTA Draping Foundation Certificate

Photo's from these sites: